Monday, February 1, 2010
Get This Look: DIY Proenza Schouler SS10 RTW
Keep reading for instructions >>
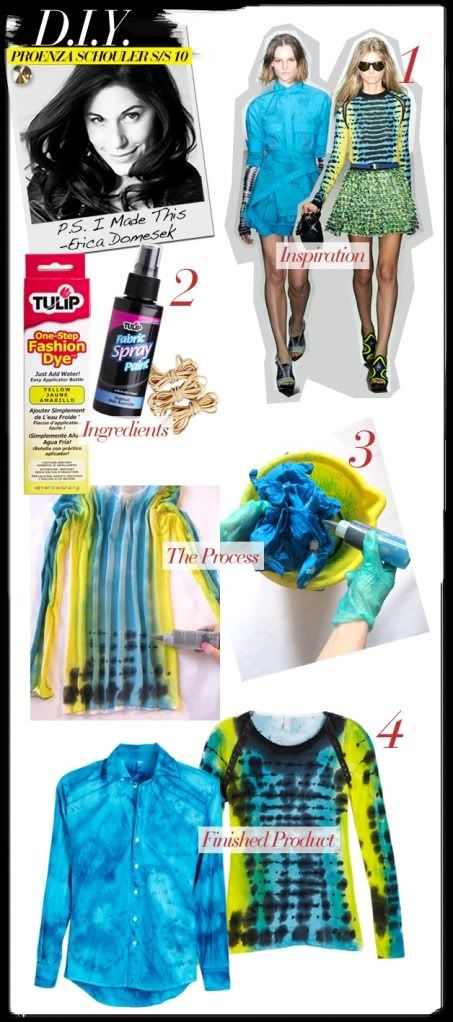
TURQUOISE TWO-TONE BUTTON-DOWN SHIRT
Ingredients:
-Rubber Bands
-Rubber Gloves
- Tulip Tie Dye ($5) in Turquoise and Blue
-American Apparel Unisex Oxford Long Sleeve Button Up Shirt ($54)
Directions:
1. Gather small sections of the shirt (on both front and the back) into little peaks. Secure each one with a rubber band, wrapping the band around the section several times. Repeat this step all over the button-down shirt. (The sections can be spaced sporadically, just make sure you have about 15 in total, including a couple on each arm.)
2. Put on gloves to avoid getting inky hands! Pour the Turquoise fashion dye all over the shirt until it is completely and evenly saturated. Alternatively, submerge the shirt in a bucket of dye for approximately 10 minutes. Make sure to squeeze out the excess dye.
3. Take your darker contrasting shade of Blue fashion dye and add sporadic dots and drips around the rubber bands on the garment. Keep in mind that the dye will bleed, a little goes a long way!
4. Finally, remove the rubber bands and hang to dry. (Erica recommends you wait three days to wash it. When you do, just follow the instructions on the shirt's label, and, to be safe, wash it in like colors or all alone!)
HORIZONTAL STRIPE SHIRT WITH RAGLAN DETAIL
Ingredients:
-Rubber Gloves
- Tulip Tie Dye ($5) in Black, Blue, and Yellow
-American Apparel Sheer Jersey Long Sleeve Tee ($26)
Directions:
1. Lay the shirt down on a flat surface. Insert a piece of cardboard in between the layers, so the dye does not bleed through from the front to the back!
2. Spray sides of the shirt with the Yellow fashion dye creating two outer panels of color.
3. Spray the middle section of the shirt with the darker contrasting color (in this case, the Blue fashion dye). It's ok if the color overlaps a little bit—we think the bleeding looks cool!
4. Let it dry flat (for approximately thirty minutes; it's ok if it’s a bit damp, as it will help the color bleed) and repeat first three steps on the backside of the shirt.
5. Once it has dried, gather the shirt in very thin vertical sections, grabbing from the neck and the bottom of the shirt (to create an accordion effect!)
6. Finally, make thin horizontal lines with the Black fashion dye (with tip applicator) across the gathered accordion surface using the tip of your tie dye bottle nozzle. Repeat on the sleeves.
7. Again, our master crafter recommends you wait for the shirt to dry for three days before washing, according to the directions on the tag. For peace of mind, wash it in like colors or all by itself first!
Via WhoWhatWear
Subscribe to:
Post Comments (Atom)


We just had a Proenza Schouler tie-dye party last night, love it :) http://fashionableearth.org/blog/2010/04/06/diy-proenza-schouler-tie-dye/
ReplyDelete